Now in this mobile is 10.1" Display,1280 x 800 pixels Display resolution, 149 ppi pixel density, Corning Gorilla Glass protraction to protect your display, 1GB Ram, 16/32 GB inbuilt memory, 64GB expandable memory,Bluetooth v4.0, 3.15 MP primary camera, Android OS, v4.2.1, Dual-core 1.6 GHz Intel Atom Z2560, Li-Po 6800 mAh battery
Today i will see you how to install official Jelly Bean in Samsung Galaxy Tab-3 P5210 Wi-Fi . It is very easy to install this os on this mobile. I am not responsible if your
mobile is damage or any problem, so read all the instruction carefully then after
starting installation process. good luck. its 100% working.
Requirement:-
1. Charge your devices up to 80%.
2. Enable USB Debugging in your device.
3. Download & Install Samsung Galaxy Tab-3 P5210 Driver. Click here to Download
1. Charge your devices up to 80%.
2. Enable USB Debugging in your device.
3. Download & Install Samsung Galaxy Tab-3 P5210 Driver. Click here to Download
4. Samsung ODIN V 3.07, Click here to Download.
5. Official Jelly Bean :- Click Here to Download
Installation Process:-
1. Enable USB Debugging in your device.
2. Switch OFF your Samsung Galaxy Tab-3
3. Open the device to Download mode. (To do this Press and hold power button + volume down Button
+ Home Button . Download screen should appear.)
4. After 2 second WARNING! Screen appears. Press the 'Volume UP' button to enter Download
Mode. Now connect your Samsung Galaxy Tab-3. in your PC through USB Cable.
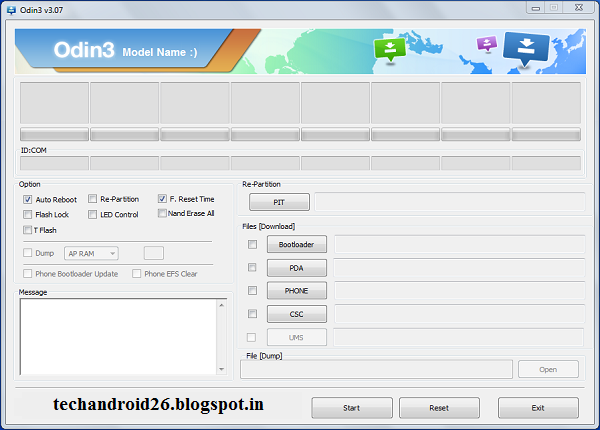
5. Run the ODIN application on the desktop. When the device is connected
successfully, the ID: COM
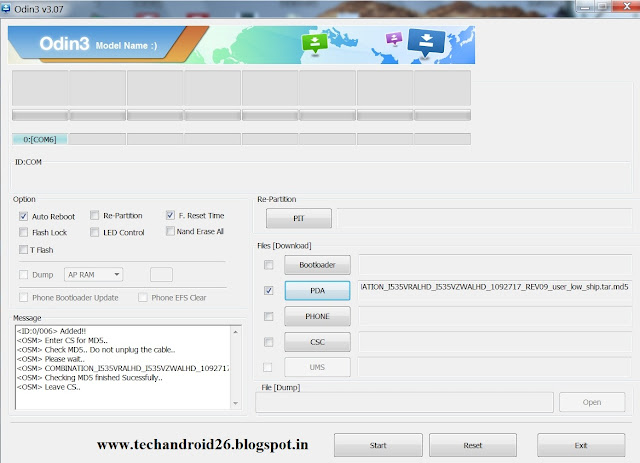
boxof ODIN screen will turn Blue or Yellow with the COM
port number. & 'Added' should appear in
the message box in Odin.(If not, then install Samsung Galaxy Tab-3 USB driver successfully
then check it again.) (Other wise don't apply next step)
A. Click the PDA button and select .tar or .md5
B. Click on ‘Phone’ then choose file with ‘MODEM’ in its name. If the file doesn't exist, ignore this step.
C. Click on ‘CSC’ then choose file with CSC’ in its name. If this file doesn't exist, ignore this step.
D. Click on ‘PIT’ then choose file with .pit file.However if this file doesn't exist, then ignore this one.
7. Tick only Auto Reboot and F.Reset Time checkboxes are selected in ODIN Screen.
Tick Re-Partition option, only if the .PIT file is selected in the step 6.(If .PIT file select then tick
Re-Partition other wise don't Tick Re-Partition box.
Verify everything suggested in Step 6 and Step 7 is done correctly.
8. Now Click the Start Button from the ODIN application and wait for some time to flash the file.
9. Wait Until Process Finishes. As Soon As Process Done, You will See That The ID:COM Section is
Turned Green With The Message “Pass”.
10. After Getting “Pass” Message, Disconnect Your Phone From The PC.
11. Now your Samsung Galaxy Tab-3 successfully Update Jelly Bean 4.2.2
Enjoy your Samsung Galaxy Tab-3 successfully Update Jelly Bean 4.2.2
Share this links with your friends
Don't used this process to other devices other wise your mobile is damage.
Note:- I am not responsible if you make any mistake and damage or any other problem your devise.
Note: If Galaxy Grand Duos I9082 stuck at booting animation
after Step 10 then go to recovery mode (press and hold the Volume Up,
Home and Power buttons together) and perform Wipe data/Factory Reset and
Wipe Cache Partition task before selecting reboot system now function.
In recovery mode use Volume keys to navigate between options and Power
key to select the option. Please note, performing wiping task will erase
your device internal memory data and not external SD card data.


0 Response to "How to Install official Jelly Bean 4.2.2 in Samsung Galaxy Tab-3 P5210 Wi-Fi."
Post a Comment