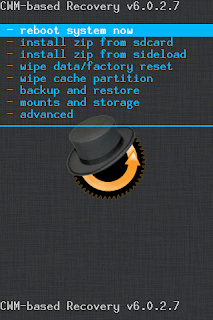
Installation Process to Install Custom Rom in Any Micromax Android Devices.
1. Backup to All important data and current OS.
2. Use CWM to take a backup of your
existing ROM. This is required, because you can use it to flash
back your
original ROM in the case of any problem to install new ROM.
3. Download Costume Rom and copy & Paste in your internal SD card.
4. Now Switch OFF your Devices.
5. Now Open your Devise in CWM recovery.(Press & Hold Volume UP+ Volume Down + Power
6. Then Press Volume UP Button to recovery Mode.3. Download Costume Rom and copy & Paste in your internal SD card.
4. Now Switch OFF your Devices.
5. Now Open your Devise in CWM recovery.(Press & Hold Volume UP+ Volume Down + Power
7. Then Go to Back up and Restore.
8. Then Press Backup your Devices. (Just wait 10 to 15 minutes)
9. After complete your back up process the press go back.
10. Then go to wipe data/factory reset.------>Yes, after complete then go back.
11. Then go to wipe cache partition.-------> Yes, after complete then go back.
13. Then go to Advance--> Wipe dalvik cache---> Yes
14. Then go to Install Zip from sdcard.---->Choose zip from sdcard.---->Select Zip file to sdcard.
15. Yes to Install this rom in your Device. After completed installation process see this
15. Yes to Install this rom in your Device. After completed installation process see this
message "Install from sdcard complete"
16. Just wait 5 to 10 minutes to complete this process. after complete this process the go back--->
16. Just wait 5 to 10 minutes to complete this process. after complete this process the go back--->
Press reboot system now (Wait for 15 to 20 Minutes because first time booting so don't worry)
Enjoy
The phone will take 10-15 minutes to start and initialize all the
services & apps because this is the first time you are starting a
phone after installing ROM. Don’t be hesitate and wait for complete
process.


0 Response to "How to Install Custom Rom in any Micromax Android Devices."
Post a Comment