

Tools Requirements:-
1. USB cable.
2. Charging Your battery up 80%.
3. Samsung Galaxy Note-3 Driver:- Click here to Download
4. Download Official 4.3 Jelly Bean OS :- Click Here to Download
5. Samsung ODIN V 3.07, Click here to Download.
Instruction:- This Official 4.3 Jelly Bean is works only Samsung Galaxy Note-3 so don't tray to other Samsung Devices.
Installation Process:-
1. Enable USB Debugging in your device.
2. Switch OFF your Samsung Galaxy Note-3
3. Open the device to Download mode. (To do this Press and hold volume Down + power button
+ Home button Download screen should appear.)
4. After 2 second WARNING! Screen appears. Press the 'Volume UP' button to enter Download
Mode. Now connect your Samsung Galaxy Note-3 in your PC through USB Cable.
5. Run the ODIN application on the desktop. When the device is connected
successfully, the ID: COM
boxof ODIN screen will turn Blue or Yellow with the COM
port number. & 'Added' should appear in
the message box in Odin.(If not, then install Samsung Galaxy Tab-3 USB driver successfully then
check it again.) (Other wise don't apply next step)

A. Click the PDA button and select .tar or .md5
B. Click on ‘Phone’ then choose file with ‘MODEM’ in its name. If the file doesn't exist, ignore this
step.
C. Click on ‘CSC’ then choose file with CSC’ in its name. If this file doesn't exist, ignore this step.
D. Click on ‘PIT’ then choose file with .pit file.However if this file doesn't exist, then ignore this one.
Note: Ignore the last three steps (B, C and D) in case such files are not found.
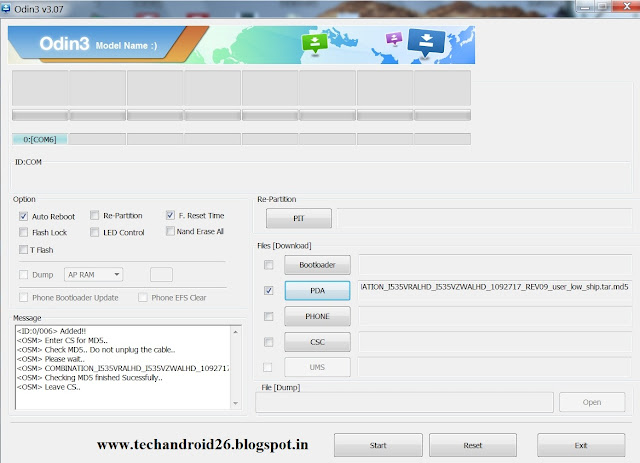 7. Tick only Auto Reboot and F.Reset Time check boxes are selected in ODIN Screen.
Tick Re-Partition option, only if the .PIT file is selected in the step 6.(If .PIT file select then tick
Re-Partition other wise don't Tick Re-Partition box.

Tick Re-Partition option, only if the .PIT file is selected in the step 6.(If .PIT file select then tick
Re-Partition other wise don't Tick Re-Partition box.
Note:- Verify everything suggested in Step 6 and Step 7 is done correctly.
8. Now Click the Start Button from the ODIN application and wait for some time to flash the file.
9. Wait Until Process Finishes. As Soon As Process Done, You will See That The ID:COM Section is
Turned Green With The Message “Pass”.
10. After Getting “Pass” Message, Disconnect Your Phone From The PC.
11. Now your Samsung Galaxy Note-3 successfully Update Jelly Bean 4.3
Enjoy your Samsung Galaxy Note-3 successfully Update Jelly Bean 4.3
Share this links with your friends
Don't used this process to other devices other wise your mobile is damage.
Note:- I am not responsible if you make any mistake and damage or any other problem your devise.
0 Response to "Update Official Android 4.3 Jelly Bean in Samsung Galaxy Note-3"
Post a Comment